Techniques
Jewelry Projects
Design Ideas
Bead Mania Gallery
click here for
Recommended Beading Books
Supplier Links
Quick Page Links
Reasons to Knot, Sources for Tri-Cord Knotter, How to Knot, Traditional Knotting, An Easier Way
Reasons to Knot
You don't have to knot, but I like to for a few reasons. The primary reason is that knots keep your beads from rubbing against each other. Also, If your necklace ever breaks you won't find all of your beads flying about the place. You will lose your beads, and if it happens on the dance floor, someone might get hurt! More than anything, I just think the necklace looks better. Instead of being stiff and inflexible, it drapes nicely. Knots also add to the length of your necklace, so you don't have to use as many beads. It's a bit more work, but I think it's worth it. And, with a Tri-Cord Knotter it really isn't that much more work.
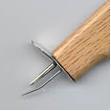
Sources for the Tri-Cord Knotter
I bought the Tri-Cord Knotter so that I could restring my cultured pearls, instead of sending them
off to the jeweler. I dropped my necklace off once and I swear it came back shorter (but that may
have been because a different weight of thread was used). So I decided to do it myself. Once I found
out how easy it is to work with this tool, I started making my own necklaces, and I just got carried
away. Bob, my husband, calls it my beading mania!
You can get the Tri-Cord Knotter from Fire Mountain
Gems or from Rio Grande. You can also visit the
Tri-Cord Knotter site for more information on their
product.
How to use the Tri-Cord Knotter
When working with the Tri-Cord Knotter you will need a doubled length of thread that is at least
twice as long as the necklace you are making. To make it easier to knot towards the end, I add on a
good extra 10 or 15 inches. I then take the thread and pull it through a wire beading needle. I match
up the two ends of the thread and place a knot at the end to hold the beads in place when I string
them. And, for this method you can go ahead and string all of your beads before knotting. Once this
is done you are ready to get started. Remember to start a with a bead tip if you are going to be
using a clasp. If you are not using a clasp, check out the method
I use to finish without a clasp.
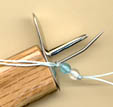
Once your beads are strung you are ready to begin working with the knotter.
Begin by placing an over hand knot up next to the first bead. Use your thumb
to bring the loop up next to the bead. Then catch the loop in the knotter,
and snug it as close as you can to the bead. Push the thumb spring lever
towards the bead, and presto, you have a perfectly snug knot. Repeat this
until you are finished. Keep in mind that you will have to pull all of the
finished beads through each loop, which can get a bit cumbersome. You can
switch sides and loop the unfinished beads through the loop when you are
half way finished, to work more quickly.
Traditional Knotting
Traditional knotting methods use a beading awl and tweezers to snug the knots up against the bead. Here is a method I found at About.com. I haven't tried this, but I wanted to include it for folks who don't want to bother with the tri-cord knotter. You will need a beading awl or a stiff beading needle. Again, you will need to ensure that you have sufficient thread to make up for the knots, and you can go ahead and string all of your beads if you want, but you will have to pull them through each loop. With this method each over hand loop is slipped onto the awl. The knot is then placed up against the bead, while still wrapped around the awl. The awl is then removed from the bead, and then you can use the awl to press the knot up against the bead.
An Easier Way to Knot
I have never used this method either, but have seen it described at About.com and at RioGrande.com. With this method you will string your beads on two separate strands of thread. One strand is the carrier strand, and the other is the knotting strand, which must be at least twice as long, if not longer. You can knot as you string with this method, or string all of the beads on to the carrier string only, and then work the knotting string through the beads as you go. Start with either a bead tip or one bead through both strands. Then, take the knotting strand and make an over hand knot over the carrier thread, and snug the knot up against the bead. String another bead, make an over hand knot, and continue until finished. Try it and let me know how well it works!
Quick Page Links
Reasons to Knot, Sources for Tri-Cord Knotter, How to Knot, Traditional Knotting, An Easier Way